iPhone IMAP Mailbox Setup Instructions (Bigbear)

1. Select Settings from your iPhone home menu
2. Select Mail, Contacts, Calendars

3. Select Add Account

4. Select Other

5. Select Add Mail Account

6. Substitute the below fields for the correct credentials regarding your email address information.

7. Select IMAP > Refer to the INCOMING / OUTGOING SETTINGS below depending on which system you are on. You need to complete all fields.
INCOMING SETTINGS:
Host Name – mail.yourdomainhere.com
Username – Use Full Email Address
Password – Use Correct Password
OUTGOING SETTINGS:
Host Name – mail.yourdomainhere.com
Username – Use Full Email Address
Password – Use Correct Password
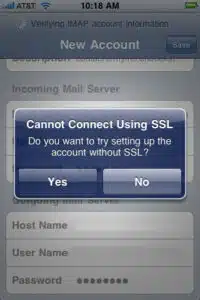
8. When attempting to verify you will receive the message “Cannot Connect Using SSL – Do you want to try setting up the account without SSL?” Select YES. After 1-2 minutes you will receive the exact same message, Select YES again. After the 2nd time you will get all check marks.

9. Mail should be set to ON and Notes should be set to OFF, Select Save
10. Congratulations you have successfully setup your mailbox to use IMAP on your iPhone.

11. From your iPhone Home Screen, Go to Settings > Mail, Contacts, and Calendars > Select the Account in Question > Select your Account

12. Under Outgoing Mail Server, Select SMTP

13. Confirm the Primary Server is ON, Select the Primary Server

14. Confirm you’ve completed the Host Name, User Name, and Password fields. Confirm Use SSL is OFF. Change Authentication to PASSWORD. Confirm Server Port is set to 25. Select DONE, Select Account (top left)
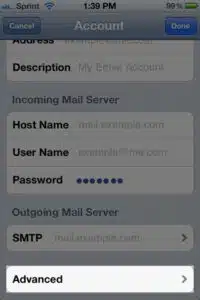
15. Select Advanced

16. Under Incoming Settings, Confirm you’ve completed the Host Name, User Name, and Password fields. Confirm Use SSL is OFF. Change Authentication to PASSWORD. Confirm Server Port is set to 143.
Get Expert Advice. Join Our Newsletter.
Receive curated tips and practical guidance to improve your digital presence and build your brand.